
Fundamentally the injection molding process has not changed since its inception. We are heating plastic to a molten state and injecting it into a cavity. What has changed is machine design, our understanding of plastic flow, and our ability to control nearly every detail of the molding process.
If you watch an injection molding machine operate, you may only see a mold opening and closing and new parts coming out. However, there is significantly more going on inside the machine to make sure the parts are the same every time. Here is a quick rundown of the process, starting with an open mold; Mold Close, Injection, Pack / Hold, Cooling / Plasticizing, Mold Open, Part Ejection.
Mold Close
In the most simple application, the molding machine closes the mold and applies clamp pressure. During that process, the molding machine is monitoring how much pressure it’s applying as a safety check. There also may be a closing “profile,” where the operator sets varying speeds as the mold closes. This profile setting comes into play more as molds become more complicated.
In more advanced applications, molds will have actions, hydraulics, over-molded inserts, and unscrewing operations that work in tandem with the mold close operation. These may operate off time, position, or mechanically with the mold. Overall, It’s important to find a balance between fast closing time and safety. It’s not worth pushing the machine to its limits to pick up a few fractions of a second, but that certainly has its place in the industry.
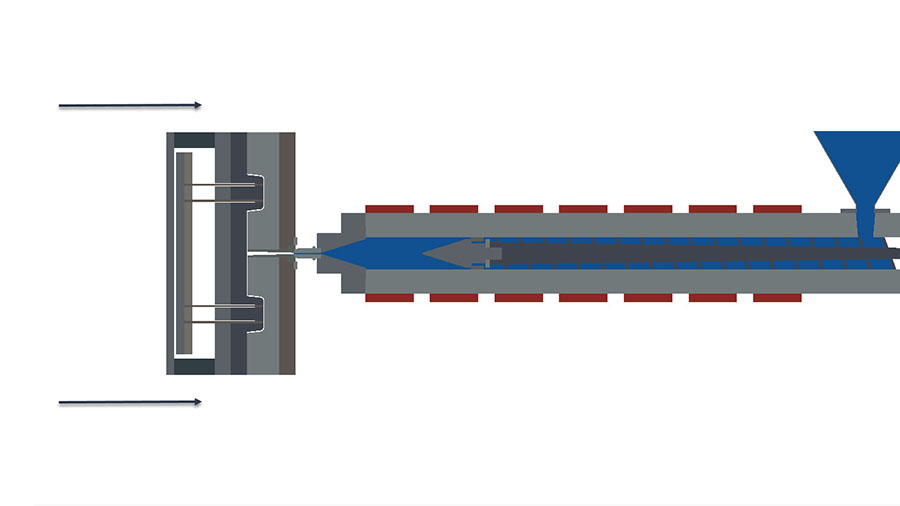
Injection
During injection, the screw moves forward, pushing molten plastic out of the barrel and into the mold cavities. We are trying to balance speed with process consistency and part quality. Injecting too fast or too slow can cause a myriad of part defects. This concept seems simple enough, but it goes much deeper than that.
We can create injection profiles and see graphical representations of this on each cycle. If needed, we can slow down or speed up the screw speed at specific locations. For Example, you may want to slow down or speed up when plastic reaches the gates or specific areas on the part. Having such a high level of control can make all the difference in producing consistent, high-quality parts.
A key aspect of injection is when to move to the next stage of pack and hold. This is known as a transfer point or V-P switch over, meaning the point where you switch from putting a volume of plastic into the mold at a specific speed to holding a specific amount of pressure for a period of time. A general rule is to fill the mold cavities nearly full (roughly 95% or more) during the injection phase.
There a few ways the molding machine can know when to make this switch. This can be done by screw position (most common), pressure limit, time, or cavity pressure. Although the position is common, the most advanced and accurate way is to have cavity pressure sensors. The cavity pressure sensors control the molding machine on each cycle via live feedback inside the mold. The downside of this system is that it requires an external control system, and each mold requires additional components.
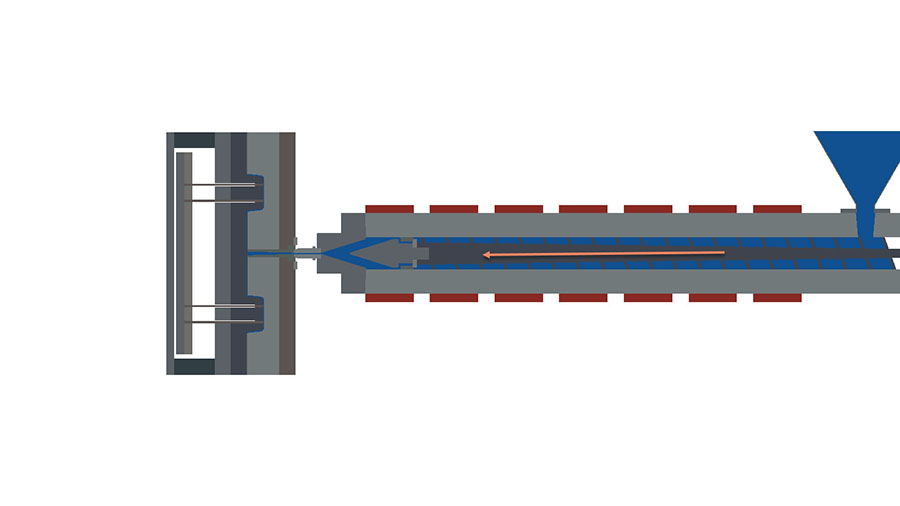
Pack / Hold
Now that the part is mostly full, we need to pack the part out the rest of the way and hold material pressure until the gates freeze. Having these pressures too low may cause sink marks in the finished part, and having them too high can cause flashing or even damage the mold. It’s also important that the gate design and size are correctly matched to the part.

Gates need to freeze (cool down) enough to isolate the part from the feed system. Having gates that are too large may take excessive time to cool. Gates that are too small may freeze off too quickly, cutting off the material flow and causing short shots or sinks.
Cooling / Plasticizing
After the pack and hold stage, the part is filled out but is still likely too hot to be removed from the mold. The cooling stage is simply time allotted for the mold to absorb heat from the plastic part. Once again, we are trying to balance cycle time against part quality and consistency. Large parts, thick wall sections, or using materials with low thermal conductivity are more likely to warp or change after molding if proper cooling time is not provided.
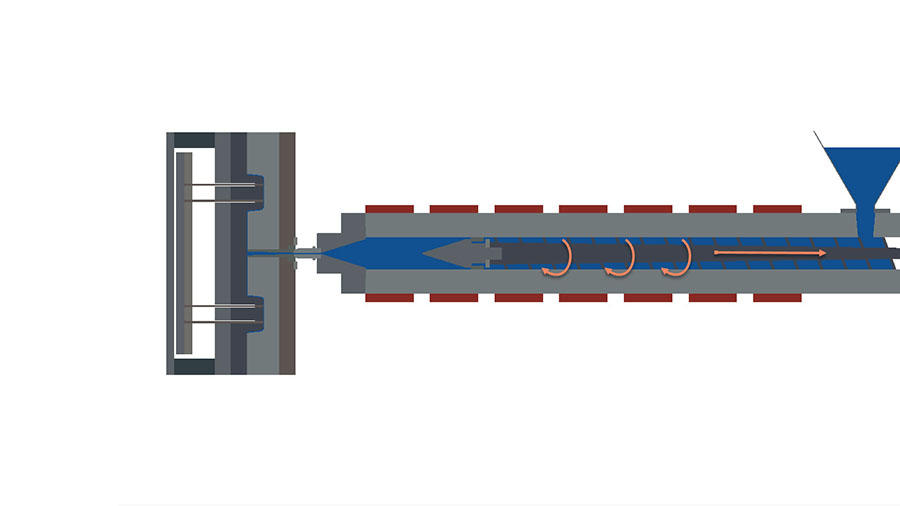
During the cooling time, the molding machine begins recharging (plasticizing) material in the barrel to prepare for the next cycle. The screw starts spinning, which conveys raw material down the barrel. As material moves forward, it pushes the screw backward (to the right in the image). As the material is conveyed down the screw (towards the left in the image) both shear heating from rotation and heater bands on the barrel (mostly shear heat) is used to melt the plastic.
The main variables used for plasticizing are screw rpm and backpressure. The rpm is simply the speed the screw rotates and the back pressure is the amount of resistance the molding machine applies against the movement of the screw. Having high screw rpm and back pressure can mix material better and raise the temperature of the plastic but can also degrade and overheat the plastic. Generally, there is enough cooling time in a cycle that the screw rpm and backpressure can be set without worrying about adding cycle time.
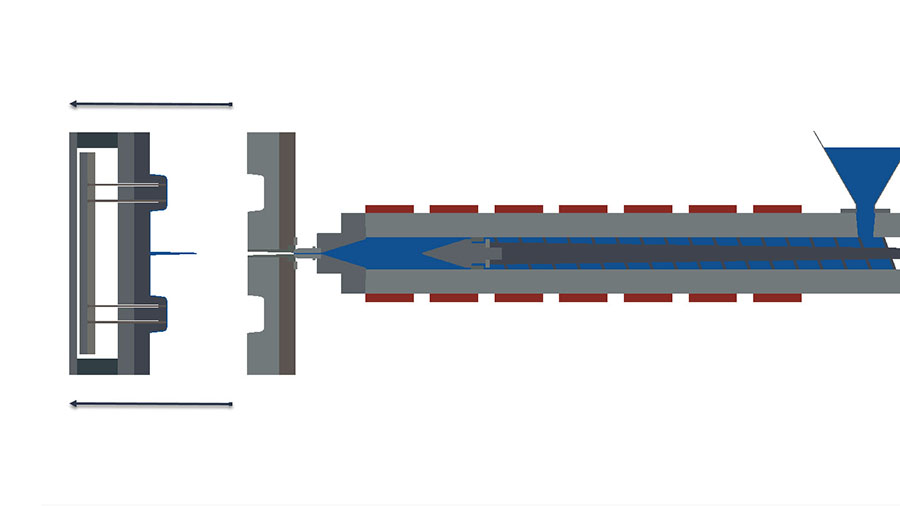
Mold Open
Once the cooling phase has completed and the molding machine has prepared for the next cycle, the mold is opened. In it’s most simple form, the mold opens, nothing exciting. However, more advanced molds may require core pulls, air blast control, or opening profiles. These other aspects of mold open are either controlled by mold position or time during the mold opening phase. Like mold closing, the speed can be changed at different positions, and the molding machine monitors the amount of force being applied to open the mold.
Part Ejection
Once the mold is open, the parts need to be removed. This may be a single pulse of the molds ejection system, or it may require varying ejection strokes and robotics. If robotics are being used, the robot will likely signal the molding machine to start the ejection process. In some applications, the ejection stage may happen while the mold is opening to decrease cycle time.

Once the parts are removed we have completed one cycle of the injection molding process. The speed of the cycle is determined by part design and mold operation. This entire process may take place in seconds or over a minute. Other variables in the process will include preparation of the molding material, barrel temperatures, mold cooling temperature, hot runner system control, integrated robotics, and interchangeable components of the molding machine.
The challenge is balancing all aspects of the molding process to produce consistent parts. Most of the variables a processor has control of will affect the others. Small changes in one phase can have implications on another phase of the process. Fortunately for injection molders, the technology available to us and, when used properly, makes the process very precise and consistent.