When injection molds are manufactured, there are several different pieces of equipment used to create the molding form. Surfaces may be CNC machined, ground, EDM’d, turned, and so on. These tooling marks may be acceptable for non-show surfaces, but in many cases, tooling marks are smoothed out or textured.
Basic Surface Finishes
The texture on the mold surface is directly transferred to the plastic part. For a part like a clear lens to be clear the molding surface will be a perfect mirror. In these cases, even a finger print or a hairline scratch can show through on the molded part. Below is a surface finish guide created by the Plastics Industry Association. The spectrum is basically like light sandpaper to a mirrored finish (D-3 to A-1).
| A-1 | Grade #3 Diamond Buff |
| A-2 | Grade #6 Diamond Buff |
| A-3 | Grade #15 Diamond Buff |
| B-1 | 600 Grit Paper |
| B-2 | 400 Grit Paper |
| B-3 | 320 Grit Paper |
| C-1 | 600 Stone |
| C-2 | 400 Stone |
| C-3 | 320 Stone |
| D-1 | Dry Blast Glass Bead #11 |
| D-2 | Dry Blast #240 Oxide |
| D-3 | Dry Blast #240 Oxide |
As you can imagine, going up the scale to the “A” surface finish gets more time consuming and therefore raises tooling cost. Starting at C-3, each stage on this scale builds on the one before it. That is, you would not start with diamond polish on a surface with tooling marks. You would work your way through the different finishes to slowly decrease the depth of microscopic scratches in the steel.
There can be many exceptions to these rules. It may not be feasible to use paper, so a larger array of stones are used. In the case of polishing small features, oscillating or ultrasonic electric hand tools are used. In the end, the guide above is a good starting point. Other factors affecting cost include the material being polished and the size/shape of the part.
The mold material (P-20, hardened steel, aluminum, and so on) all vary in difficulty to polish. If the mold is made from hardened tool steel, it can be time-consuming to get to the finest surface finishes. Aluminum is on the other end of the spectrum and polishes extremely easy.
It’s also common for the B-side (non-show side) of tooling to have more complicated features like ribs and coring. These features can be hard to reach and hard to polish. These tight areas must get some level of polish to avoid sticking during ejection. However, getting these areas to a fine finish can be time-consuming.
To save on tooling cost, it’s common to pick a rougher surface on a non-show side and a finer finish on the show side (A-side). An bonus is the different surface textures can help the mold function by gripping one side of the part more, ensuring it stays on the ejection side of the mold.
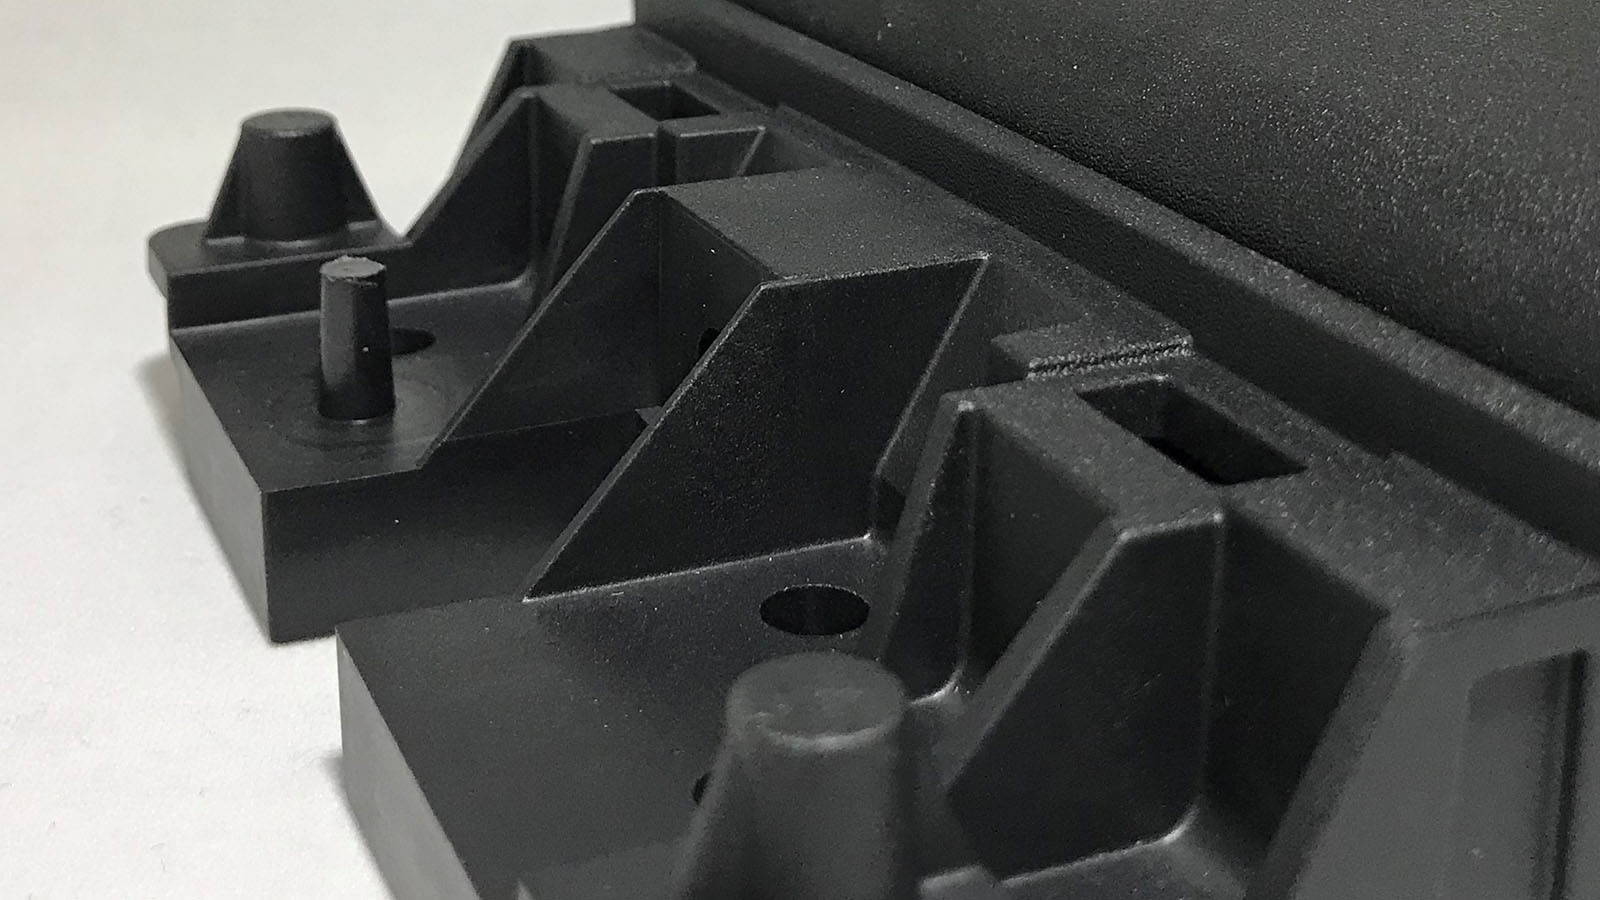
EDM Texture
Sinker EDMs create a sandpaper-like texture as a normal part of their operation. The image at the top of the page is a good example of that. Since EDMs use electricity to remove material, making rougher surface finishes is as simple as applying a higher current through the electrode. Therefore, the roughness of the texture is directly related to the intensity of the settings on the EDM. Practically speaking, the finish can vary from the equivalent of roughly 40 grit sandpaper to around 600 grit sandpaper.
Other Textures
There’s also more textures available through acid etching, laser engraving, or CNC machining designs right onto the surfaces. Some of the specialized surface finishes like acid etching are used in other industries, so most molders outsource that aspect of the tool build. The mold builder will usually prepare the surface to a specified polish level before sending the components out for the texturing process.
Design Considerations
When textures are more aggressive (in terms of the height of the microscopic peaks and valleys), the part design may need to be drafted more to avoid drag marks during ejection. It’s also important to consider the location of parting lines. If two components come together when the mold is closed, it should be textured while in place to minimize the appearance of the parting line. Cam actions are good examples of this.
There are many different textures available for injection molds. It’s important to consider the options early in the design process. Not only can the specified finish affect the tooling cost, but it may also affect part design. Your mold builder should present you with these options and talk through your specific application.
This post is part of our Designing for Injection Molding series. Check out more here.